This blog is based on Accelerator Customisations
This example explains how to add in a list to the company summary screen.
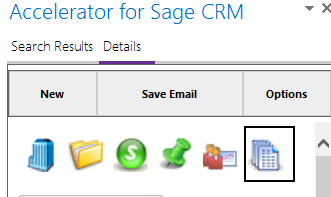
First, we add in a tab
Our file in this example is called
ctProductSupport/CompFilterOUTLOOK.asp
within Accelerator this will display as
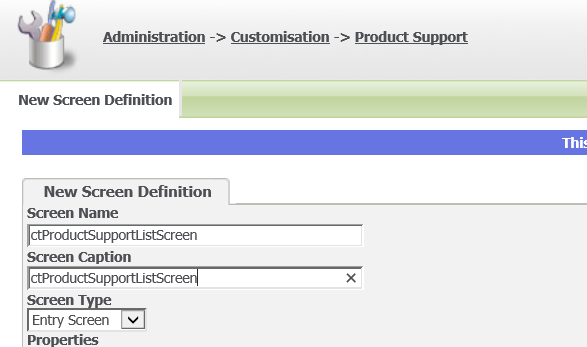
Next within our custom entity (Product Support), we create

and add fields
——————————-
Next we need to build our page
In the code below you will need to change the values in RED to match your entity field names and screen names and anything specific to your CRM configuration
CompFilterOUTLOOK.asp
<!– #include file =”..\crmwizard.js” –>
<html xmlns=”http://www.w3.org/1999/xhtml” >
<head id=”Head1″><title>
Sage CRM
</title>
<link type=”text/css” rel=”Stylesheet” href=”/crm/Themes/color1.css” />
<meta http-equiv=”cache-control” content=”no-cache” /><meta http-equiv=”pragma” content=”no-cache” /><meta http-equiv=”expires” content=”-1″ /></head>
<script>
function fix72Layout() {
document.body.style.overflow = “auto”;
//crm73 fixes
if ($(“#CoachingDiv”).length > 0) {
$(‘#CoachingDiv’).css(‘width’, ‘100%’);
$(‘#CoachingDiv’).css(‘margin-left’, ‘0px’);
}
}
try {
window.addEventListener(“load”, fix72Layout);
} catch (ex) {
window.attachEvent(“onload”, fix72Layout);
}
</script>
<body>
<%
var CurrentCompanyID=CRM.GetContextInfo(“company”, “Comp_CompanyId”);
if (!CurrentCompanyID) //no context found
{
CurrentCompanyID=Request.QueryString(“id”); //we get the id from the url as this is the company id
}
//build the menu
var _menu='<div id=”pnlMenu”>’;
//get the menu
var menu_sql=’select * from custom_tabs where Tabs_Entity=\’companyint\’ and Tabs_Deleted is null order by tabs_order’;
var menu_obj=CRM.CreateQueryObj(menu_sql);
menu_obj.SelectSQL();
var imgArry=[‘company’,’case’,’opportunity’,’newtask’,’customercare’,’notes’];
var idx=0;
while (!menu_obj.eof)
{
var _link=menu_obj(“Tabs_CustomFileName”);
_link=CRM.Url(_link)+”&id=”+CurrentCompanyID;
var _caption=menu_obj(“Tabs_Caption”);
_menu+='<span id=”spanMetaSummary” style=”padding:5px;”>’+
‘<input type=”image” name=”ctl04″ title=”Summary” src=”../../Themes/Img/Color/Icons/small_’+imgArry[idx]+’.gif” ‘+
‘alt=”‘+_caption+'” onclick=”window.navigate(\”+_link+’\’);return false;”‘+
‘style=”border-style:None;height:35px;width:35px;border-width:0px;padding:5px;” /></span>’;
idx++;
menu_obj.NextRecord();
}
_menu+='</div>’;
////////////////////////////now build the data//////////////////////////////////////////
var _tableName=”ctProductSupport“; //this is the table
var _listScreenName=”ctProductSupportListScreen“;//create this screen in CRM (against the talble above) – make sure each field is on a new line
container = CRM.GetBlock(‘container’);
container.DisplayButton(Button_Default) = false;
var content=CRM.GetBlock(“content”);
container.AddBlock(content);
//now we get the product support data list
//this is our SQL to get the data
var _aq_sql=”select prsu_ctProductSupportID,prsu_name from ctProductSupport where prsu_companyid=”+CurrentCompanyID+” and prsu_Status in (‘Quoted’, ‘Open’,’Renewing’)“;
var _aq=CRM.CreateQueryObj(_aq_sql);
_aq.SelectSQL();
//now we loop through the data
while (!_aq.eof)
{
//this is the screen (*not list) in crm that we use
var ListEntryBlock=CRM.GetBlock(_listScreenName);
ListEntryBlock.DisplayButton(Button_Default) = false;
ListEntryBlock.Title=_aq(“prsu_name“);
//get the single record now for our screen
var _singlerecord = CRM.FindRecord(“ctProductSupport“, “prsu_ctProductSupportID=”+_aq(“prsu_ctProductSupportID“));
content.contents+=ListEntryBlock.Execute(_singlerecord)+”<br />”;
_aq.NextRecord();
}
var _page=container.Execute();
Response.Write(_menu+_page);
%>
</body>
</html>
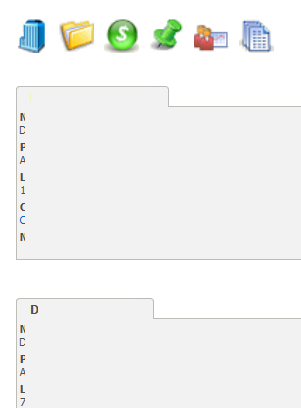
This will then display something like below (we have hidden details on the below sample)
************************************************************************************************************************
Update: With CRM 72 and later the scroll bars in the browser seem to go missing. To fix this add in the code
This blog is based on Accelerator Customisations
This example explains how to add in a list to the company summary screen.
First, we add in a tab
Our file in this example is called
ctProductSupport/CompFilterOUTLOOK.asp
within Accelerator this will display as
Next within our custom entity (Product Support) we create

and add fields
Next we need to build our page
In the code below you will need to change the values in RED to match your entity field names and screen names and anything specific to your CRM configuration
CompFilterOUTLOOK.asp
<!– #include file =”..\crmwizard.js” –>
<html xmlns=”http://www.w3.org/1999/xhtml” >
<head id=”Head1″><title>
Sage CRM
</title>
<link type=”text/css” rel=”Stylesheet” href=”/crm/Themes/color1.css” />
<meta http-equiv=”cache-control” content=”no-cache” /><meta http-equiv=”pragma” content=”no-cache” /><meta http-equiv=”expires” content=”-1″ /></head>
<script>
function fix72Layout() {
document.body.style.overflow = “auto”;
//crm73 fixes
if ($(“#CoachingDiv”).length > 0) {
$(‘#CoachingDiv’).css(‘width’, ‘100%’);
$(‘#CoachingDiv’).css(‘margin-left’, ‘0px’);
}
}
try {
window.addEventListener(“load”, fix72Layout);
} catch (ex) {
window.attachEvent(“onload”, fix72Layout);
}
</script>
<body>
<%
var CurrentCompanyID=CRM.GetContextInfo(“company”, “Comp_CompanyId”);
if (!CurrentCompanyID) //no context found
{
CurrentCompanyID=Request.QueryString(“id”); //we get the id from the url as this is the company id
}
//build the menu
var _menu='<div id=”pnlMenu”>’;
//get the menu
var menu_sql=’select * from custom_tabs where Tabs_Entity=\’companyint\’ and Tabs_Deleted is null order by tabs_order’;
var menu_obj=CRM.CreateQueryObj(menu_sql);
menu_obj.SelectSQL();
var imgArry=[‘company’,’case’,’opportunity’,’newtask’,’customercare’,’notes’];
var idx=0;
while (!menu_obj.eof)
{
var _link=menu_obj(“Tabs_CustomFileName”);
_link=CRM.Url(_link)+”&id=”+CurrentCompanyID;
var _caption=menu_obj(“Tabs_Caption”);
_menu+='<span id=”spanMetaSummary” style=”padding:5px;”>’+
‘<input type=”image” name=”ctl04″ title=”Summary” src=”../../Themes/Img/Color/Icons/small_’+imgArry[idx]+’.gif” ‘+
‘alt=”‘+_caption+'” onclick=”window.navigate(\”+_link+’\’);return false;”‘+
‘style=”border-style:None;height:35px;width:35px;border-width:0px;padding:5px;” /></span>’;
idx++;
menu_obj.NextRecord();
}
_menu+='</div>’;
////////////////////////////now build the data//////////////////////////////////////////
var _tableName=”ctProductSupport”; //this is the table
var _listScreenName=”ctProductSupportListScreen”;//create this screen in CRM (against the talble above) – make sure each field is on a new line
container = CRM.GetBlock(‘container’);
container.DisplayButton(Button_Default) = false;
var content=CRM.GetBlock(“content”);
container.AddBlock(content);
//now we get the product support data list
//this is our SQL to get the data
var _aq_sql=”select prsu_ctProductSupportID,prsu_name from ctProductSupport where prsu_companyid=”+CurrentCompanyID+” and prsu_Status in (‘Quoted’, ‘Open’,’Renewing’)”;
var _aq=CRM.CreateQueryObj(_aq_sql);
_aq.SelectSQL();
//now we loop through the data
while (!_aq.eof)
{
//this is the screen (*not list) in crm that we use
var ListEntryBlock=CRM.GetBlock(_listScreenName);
ListEntryBlock.DisplayButton(Button_Default) = false;
ListEntryBlock.Title=_aq(“prsu_name”);
//get the single record now for our screen
var _singlerecord = CRM.FindRecord(“ctProductSupport”, “prsu_ctProductSupportID=”+_aq(“prsu_ctProductSupportID”));
content.contents+=ListEntryBlock.Execute(_singlerecord)+”<br />”;
_aq.NextRecord();
}
var _page=container.Execute();
Response.Write(_menu+_page);
%>
</body>
</html>
This will then display something like below (we have hidden details on the below sample)
************************************************************************************************************************
Update: With CRM 72 and later the scroll bars in the browser seem to go missing. To fix this add in this code to the page
<script>
function fix72Layout()
document.body.style.overflow = “auto”;
//crm73 fixes
if ($(“#CoachingDiv”).length > 0) {
$(‘#CoachingDiv’).css(‘width’, ‘100%’);
$(‘#CoachingDiv’).css(‘margin-left’, ‘0px’);
}
}
try {
window.addEventListener(“load”, fix72Layout);
} catch (ex) {
window.attachEvent(“onload”, fix72Layout);
}
</script>


